Beginner's guide to Svelte - Faster and Better🎆
We will build a task board from scratch using Svelte ✌️
Table of contents
Hey Everyone 👋👋
I hope you all are doing good!✌️.
Svelte is an open-source javascript compiler used to build static fronted applications just like react and other frontend frameworks. Also svelte is faster than react as it compiles the written code to simple vanilla js, hence making it faster in performance and also faster in terms of development. If you are just getting started with Web Dev svelte is the best thing to learn as the learning curve for svelte is pretty flat.🌟
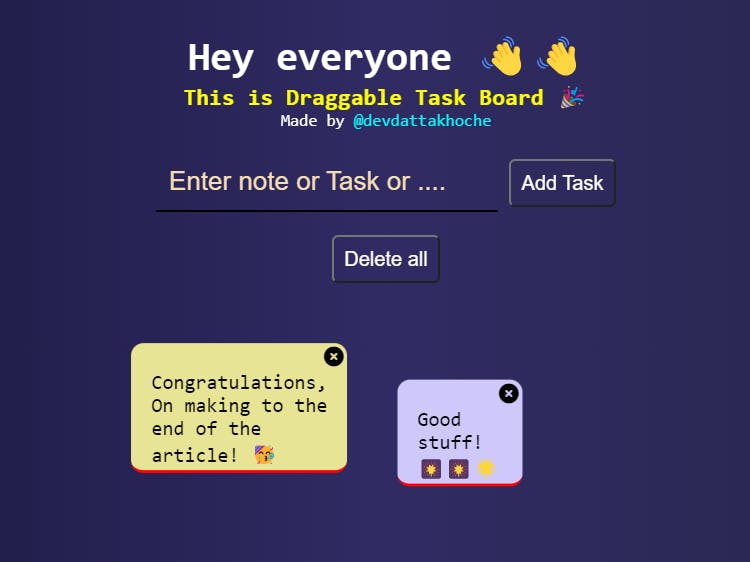
In this article, we will look at how Svelte works, we will learn how to set up our local environment, create a Draggable Taskboard and see how to run it locally. At the end of the article, we will have something like this:
Here is the deployed link of the same.

For those who are really excited, here is the github link, you can find all the code here.
⚙️ Svelte Architecture
Svelte uses a completely new approach for building rich graphical user interfaces. With that said let's have a look at how svelte works and is much faster than React and other libraries or tools.
Svelte compile the components which are written in simple HTML, Javascript and CSS to simple Vanilla Javascript, this helps a lot in improving speed. Also as it is Vanilla Javascript while creating the build svelte only bundles HTML, CSS and Javascript creating really optimised and tiny bundles. The reason this helps is that you don't need to get framework code to run your application as we do it in React.
Another major advantage or which can also be said as a drawback is that it also doesn't use Virtual DOM. In React whenever there is a change in the state of the component react updates the Browser DOM with reconciliation Diffing algorithm. As this is not there in svelte it is a plus point in terms of performance. Here is a block diagram of svelte. So Svelte it then! 😅😅😎

Now enough of the theory part let us get started with the TaskBoard.✌️🌟

📜 TaskBoard - Svelte
🖇️Step 1 : Installation
Installing svelte is pretty simple. To do so you need a node installed in your system. To install the svelte template, open up your terminal and hit the below command :
npx degit sveltejs/template svelte-taskboard
Once you are done with this, you will have a folder svelte-taskboard which contains all the files to get you started. This folder is a template of the svelte and we need to install the libraries to start the development server.
cd svelte-taskboard
npm install
Now the application is ready to start by using the following command:
npm run dev
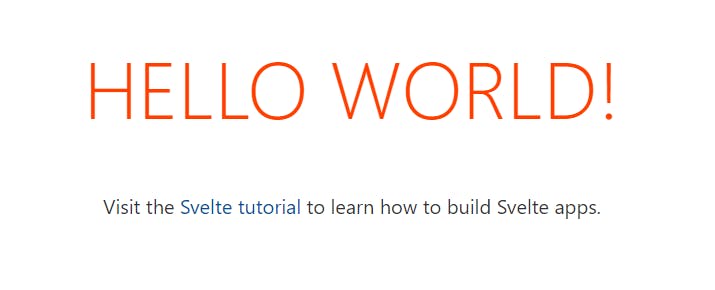
To check if the development server is running or not you can hit http://localhost:8080 in your browser. This is what you will have :

Step 2: 🟧 Files and Svelte Structure
Svelte components are stored with the file extension as .svelte. Each Svelte file can have the three things :
- Script (Vanilla JS)
- Style (CSS)
- Template (HTML)
This is how a simple svelte component looks :
<script>
    let name = 'world';
</script>

<h1>Hello {name}!</h1>

<style>
    h1{
        color : red;
    }
</style>
You can play with this code here.
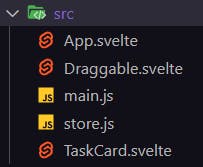
We need to create three files in the src (source) folder, which are TaskCard.svelte , store.js, and Draggable.js.

Step 3: 🌟 Adding State and General CSS
Firstly change your global.css in the public folder and add the necessary CSS.
*{
    margin: 0;
    padding: 0;
}

html{
    height: 100%;
}

body{
    position:fixed;
    padding:0;
    margin:0;

    top:0;
    left:0;

    width: 100%;
    height: 100%;
    font-family: 'Roboto Mono', monospace;
  }

  *:focus {
    outline: none;
  }
Now generally you can handle state variables in the script tag itself in svelte files, but it is better to use stores. A store is simply an object with a subscribe method that allows interested components to be notified whenever the store value changes.
We will be using a simple array to store our tasks.
To create a store we use writable by svelte. It takes the state variable which will be an empty list.
// store.js
import { writable } from "svelte/store";
export const tasks = writable([]);
Once you have done this, you can access the array from any file by simply importing it.
Step 4: 🎆Draggable Component
Now let us first create the draggable component which will allow us to move any HTML element enclosed by it throughout the screen and even outside the screen.
<script>
    export let left =Math.random()*100 + Math.random()*500 ;
    export let top = Math.random()*100 + Math.random()*500 ;

    let moving = false;

    function start(e) {
        moving = true;
    }

    function stop(e) {
        moving = false;
    }

    function move(e) {
        if (moving) {
            left += e.movementX;
            top += e.movementY;
        }
    }
</script>

<style>
    .draggable {
        position: absolute;
        cursor:-webkit-grabbing
    }
</style>

<svelte:window on:mouseup={stop} on:mousemove={move}  />

<section on:mousedown={start} style="left: {left}px; top: {top}px;" class="draggable">
    <slot></slot>
</section>
As HTML elements can have children, in Svelte we can create children of the components too. slot tag does exactly that. Before a component can accept children, though, it needs to know where to put them. We do this with the <slot>element. In simple words whatever is enclosed by this Draggable component, it will end in the place of the slot element.
Logic :
- Whenever
onmousedownaction on thesectionwe change the state ofmovingtotrue.- Similarly
onmouseupaction we change the state of themovingtofalse. - Now, when
movingis true that we are moving the element, we add thexandychange of the mouse toleftandtopand assign it to thesection.
- Similarly
export let left =Math.random()*100 + Math.random()*500 ;
export let top = Math.random()*100 + Math.random()*500 ;
Initially, this code generates random values for the card.
Now let us create the card component which will be enclosed in the Draggable.svelte.
Step 5: 🎆Card Component and Deleting a task
The card component will receive an item which will be the content of each card
that is title and id of the card. The id will be unique as we need it for deleting the particular card.
<script>
  import Draggable from "./Draggable.svelte";
  import { tasks } from "./store";

  export let item;

  const deleteTodo = (id) => {
    $tasks = $tasks.filter((item) => {
      return item.id != id;
    });
  };

  var color = generateLightColorHex();

  function generateLightColorHex() {
    let color = "#";
    for (let i = 0; i < 3; i++)
      color += (
        "0" +
        Math.floor(((1 + Math.random()) * Math.pow(16, 2)) / 2).toString(16)
      ).slice(-2);
    return color;
   }

</script>

<Draggable>
  <div class="card" style="--background-color: {color}">
    <i on:click={() => deleteTodo(item.id)} class="fa-solid fa-circle-xmark" />
    <div class="container">
      <p>{item.title}</p>
    </div>
  </div>
</Draggable>
Here deleteTodo function takes a parameter id and deletes the particular task from the store. Also, we use generateLightColorHex to generate random light colors for our cards.
Now I just wanted a small icon on the card so I used font awesome CDN. You can use it by including its URL in your index.html which resides in the public folder.
Get your kit here
Once you have the CDN link add it to your head tag, like this:
<script src="https://kit.fontawesome.com/be1d858282.js" crossorigin="anonymous"></script>
Once we are done with the card, let's now add some style in the same file below. Also, you can notice below that I have passed a variable of background color which we generate in the above code.
<style>
  .card {
    border-bottom: 3px solid red;
    border-radius: 10px;
    background-color: var(--background-color);
    user-select: none;
    position: absolute;
    top: 50%;
    left: 50%;
    transform: translate(-50%, -50%);
    max-width: 215px;
    min-width: 100px;
    overflow-wrap: break-word;
  }

  p {
    margin-top: 20px;
  }

  .container {
    padding: 2px 16px;
  }

  i {
    margin: 3px;
    float: right;
  }

  i:hover {
    cursor: pointer;
  }
</style>
Amazing, we are close enough to the end!🌟

Step 6: 🎆Adding New Card
Finally, we will add the code for the final component which will add the task.
Here is the code in your App.svelte.
<script>
  import TaskCard from "./TaskCard.svelte";
  import { tasks } from "./store.js";

  const addTask = () => {
    let taskText = document.getElementById("task").value;

    if (!taskText) {
      alert("Oops!! It seems that the Task is Empty");
      return;
    }

    const task = {
      id: Date.now().toString(36),
      title: taskText,
    };

    $tasks = [...$tasks, task];

    document.getElementById("task").value = "";
  };
</script>

<div class="input-center">
  <h1>Hey everyone 👋👋</h1>
  <h3>This is Draggable Task Board 🎉</h3>
  <small
    >Made by <a target="blank" href="https://devsblog.hashnode.dev/"
      >@devdattakhoche</a
    ></small
  >
  <br />
  <div>
    <input
      id="task"
      type="text"
      placeholder="Enter note or Task or ...."
      size="20"
    />
    <button on:click={addTask}>Add Task</button>
  </div>
  <br />

  {#if $tasks.length > 0}
    <button on:click={() => ($tasks = [])}>Delete all </button>
  {/if}

  {#each $tasks as item}
    <TaskCard {item} />
  {/each}
</div>
Logic :
- To add a new card we check if the content is not empty
- If it is we send an alert and return
- Else we create an object with a unique
idwhich is the timestamp and thetitleas the content. - To access the array in store, we use the
$sign,&tasksgives the array. - We don't want to be destructive here, so we spread the array and append the new object to the store.
- Once this is done we clear the text of the input field
- We show the delete all button when the length of the stored array is greater than one.
- To delete all, we just set the array to an empty array.
- Finally, we loop through the array and pass each object to the
TaskCardwhich is there in stored array.
Once we are done with this, let's add some CSS for the component.
<style>
  :global(body) {
    background: #0f0c29; /* fallback for old browsers */
    background: -webkit-linear-gradient(
      to left,
      #24243e,
      #302b63,
      #0f0c29
    ); /* Chrome 10-25, Safari 5.1-6 */
    background: linear-gradient(
      to left,
      #24243e,
      #302b63,
      #0f0c29
    ); /* W3C, IE 10+/ Edge, Firefox 16+, Chrome 26+, Opera 12+, Safari 7+ */
  }

  h3 {
    color: yellow;
  }

  h1,
  small {
    color: white;
  }

  a {
    color: aqua;
    text-decoration: none;
  }

  input {
    border: 0;
    color: white;
    font-size: 1.3em;
    background-color: transparent;
    padding: 0.5em;
    border-bottom: 2px solid black;
  }

  input:hover {
    transform: scale(1.001, 1.001);
    transition: all 00.5s;
    outline: none;
    border-bottom: 2px solid white;
  }

  input:focus {
    /* outline: none; */
    transform: scale(1.001, 1.001);
    transition: all 00.5s;
    outline: none;
    border-bottom: 2px solid yellow;
  }

  input::placeholder {
    color: wheat;
  }

  button {
    border: 1;
    border-radius: 5px;
    color: white;
    font-size: 1em;
    background-color: transparent;
    padding: 0.5em;
  }

  .input-center {
    display: flex;
    flex-direction: column;
    justify-content: center;
    align-items: center;
    width: 100%;
    height: 70%;
  }
</style>
Step 7: 🎆Adding Localstorage
Adding local storage in Svelte is really simple. This is the code for the same, you can add it in the store.js
// store.js

import { writable } from "svelte/store";

const itemName = "taskStorage"
const retrieved = localStorage.getItem(itemName)
const parsed = JSON.parse(retrieved)

export const tasks = writable(parsed === null ? [] : parsed)

tasks.subscribe(value =>
  localStorage.setItem(itemName, JSON.stringify(value))
)
Here we first choose a variable name which we will refer for our array. After that, we get the array from the localstorage. In localstorage we can't store arrays or JSON objects, so we convert them to string and then store them. So once we retrieve our array we parse it in the JSON object. If the array is null we initialise it to an empty array else we keep it as it is.
Finally, we subscribe to the store which is tasks here, so that whenever there is an update in the store, it will modify the localstorage as well.🌟
Step 7 : 🏃♀️Running it locally
To run the svelte app locally , open up your terminal/cmd in the root directory and hit the command npm run dev.
Once you have done this ,go the http://localhost:8080.
and voila 🌟🌟🌟.

🎯 Final thoughts
Amazing ! 🌟
Congratulations on making it to the end of the article ✌️.
This taskboard really gives an overview of how to use svelte and svelte components. Feel free to make your own styling as I don't have a creative head.😅😅
I hope you have enjoyed the article! Give me a follow if you think it was helpful!
Oh ! Also I forgot to mention the github link , you can find the code here.
Good-bye, I'll see you next time.


